
Training Package on Workplace Risk Assessment and Management for Small and Medium-Sized Enterprises
Summary Statement
This ILO document is a training package aimed at owners and managers of small to medium-sized enterprises to help them improve risk assessment and management of safety and health in the workplace. The document provides step by step guidance and should prove useful to workers and their representatives, employers’ organizations and trade unions who may use the materials in training for their members.
The training package consists of three modules. The main module is a self-help tool which covers the five steps of carrying out a risk assessment. A second module outlines a trainers’toolkit with activity sheets to guide participants through the risk assessment process. The third module gives examples of risk assessments for selected occupational
sectors including construction.
2013
This training package was produced under the project “Linking safety and health at work to sustainable economic development: From theory and platitudes to conviction and action” (2009–2012), funded by the Swedish International Development Cooperation Agency (SIDA).
The project promotes the improvement of occupational safety and health for all workers through the development of global products addressing the methodological and informational gaps in this field, and through the mobilization of national stakeholders towards the implementation of practical measures at national, local and enterprise levels. The outputs of the project include training materials, practical tools and policy guidance to reinforce national and local capacities in occupational safety and health, and to help constituents design and implement occupational safety and health policies and programmes.
Preface
This training package on risk assessment and management at the workplace seeks primarily to empower owners and managers of small and medium-sized enterprises (SMEs) to take action themselves to improve safety and health conditions in their workplaces.
Work-related injuries and ill health can ruin lives and affect businesses if output is lost, machinery damaged, insurance costs increase, etc. This is something that small businesses, particularly vulnerable to the impact of occupational accidents and work-related ill health, cannot afford – morally and economically. It is precisely to avoid this sort of situation that this training package has been devised.
Risk assessment as a key tool in managing occupational safety and health at an enterprise and gives employers and businesses a means to be proactive, to identify hazards and take action to remedy problems before they cause an accident or ill health. As this training package demonstrates, the solutions are not so difficult to develop as they are based on the owner’s and workers’ intimate knowledge of their own workplace. The aim is to help employers and workers find costeffective, practical solutions to control risks in their workplaces.
The training package is designed to help those running and working in SMEs, as well as those who work with or provide services to SMEs, work step by step through the logistics of a risk assessment. It is aimed primarily at owners/employers of SMEs, the people who are responsible – legally in many countries – for ensuring that risk assessment is part and parcel of doing business. It is also of interest to others, the workers and their representatives at the workplace, labour inspectors, employers’ organizations and trade unions who may use the materials in training for their members.
The training package consists of three modules. The main module is a self-help tool which covers the five steps of carrying out a risk assessment. It will instill confidence and empower owners and workers of SMEs to carry out their own risk assessments. A second module outlines a trainers’ toolkit, developed to support risk assessment training courses and to help trainers plan risk assessment programmes. It includes activity sheets to guide participants through the risk assessment process. Finally, a third module gives examples of risk assessments for selected occupational sectors where SMEs are prevalent.
I hope that the training package will serve its purpose as a simple, practical tool to help employers and workers find cost-effective, practical solutions to control the risks in their workplaces to the benefit of workers and owners alike.
Seiji Machida, Director,
SafeWork.
Acknowledgements
The development of this training package would not have been possible without the financial contribution from the Swedish International Development Cooperation Agency (SIDA).
Mr Peter Hurst, consultant in occupational safety and health, drafted the training package and piloted it in a training course with ILO constituents representing several different occupational sectors in Malawi. Ms Annie Rice and Mr Andrew Christian from the ILO SafeWork Programme provided technical contributions for finalizing the contents. Ms Amélie Schmitt, Chief Technical Adviser of the SIDA funded project, coordinated the development of this product.
Table of Contents
Preface
Acknowledgements
Introduction
About the training package
PART I RISK ASSESSMENT METHODOLOGY
- Basic concepts and terminology on risk assessment
- Carrying out the risk assessment
STEP 1: Identify the hazards
STEP 2: Identify who might be harmed and how
STEP 3: Evaluate the risk – identify and decide on the safety and health risk control measures
STEP 4: Record who is responsible for implementing which risk control measures, and the timeframe
STEP 5: Record your findings, monitor and review your risk assessment, and update when necessary
PART II. TRAINER’S TOOLKIT
- Planning, conducting and evaluating training activities: Checklists for trainers
- Activities on risk assessment
Activity 1 – STEP 1: Identifying hazards in the workplace
Activity 2 – STEP 2: Who is at risk, and how?
Activity 3 – STEP 3 A and B: Identifying and deciding on risk control measures
Activity 4 – STEP 4: Evaluating the degree of risk, and prioritizing risks for action
PART III: EXAMPLES OF RISK ASSESSMENTS FOR SELECTED WORKPLACES
Introduction
Although small and medium-sized enterprises (SMEs) are very important and represent the vast bulk of businesses worldwide, many of them fail to grow or even survive. Each year, problems of low productivity and poor quality products and services, as well as marketing and finance difficulties lead thousands to bankruptcy. These obstacles often result from the same difficulties and lack of organization that make work hazardous and unpleasant. Such SMEs have untapped potential for change that can easily lead to better product quality, improved working conditions and safety and health, and overall a more competitive enterprise. However, they often lack the tools and techniques to implement such changes. 1
One of the key tools or techniques for improving safety and health conditions in SMEs is workplace risk assessment, which is a central element of enterprise risk management. Risk management encompasses a whole range of solutions, which can also include company safety and health policies, workplace safety and health committees, training and information on occupational safety and health (OSH), setting targets for OSH improvements and risk communication.
Safety and health risk assessment is an increasingly widely used risk management technique in businesses worldwide. Risk assessment as an aid to risk management can be used by companies and enterprises of all sizes – small, medium and large – to help make their workplaces safer and healthier, and to improve their business efficiency and competitiveness.
Risk assessment is a self-help tool. It allows employers and businesses, with the participation of the workforce, to take action themselves to remedy safety and health problems and come up with cost-effective solutions. Using risk assessment, employers and businesses identify and evaluate the risks that arise in their workplaces and, based on their analysis, they can then put sensible safety and health measures in place, in order to control them. 2 Risk assessment can be used to establish priorities so that the most dangerous situations are addressed first and those least likely to occur and least likely to cause major problems can be considered later; this is also cost-effective.
Using risk assessment to tackle their daily OSH problems avoids SMEs having to over-rely on (often costly) external experts, consultants or officials to advise them what is wrong and how to solve their problems (although they may, of course, seek advice and help from such people). Whoever undertakes the risk assessment – even if it is an external service – it is the employer who is ultimately responsible for organizing this assessment and its eventual adoption and implementation.
OSH is often seen as so much paperwork, red tape, expense and boring rules and regulations that are difficult to understand and tend to make it more difficult for owners and managers to run their businesses. Even among those who do not think in this way, many believe that because they have had few or no accidents, all that is needed is basic common sense and that, in any case, most accidents these days are unavoidable.
Relying on people to use their common sense works fine – until something does go wrong. When this means that someone is killed or seriously injured, it can suddenly look like a rather inadequate approach. Too many employers live to regret not having taken OSH more seriously before an accident, rather than after one of their workers has been badly injured at work. Risk assessment gives employers and businesses a way to be proactive, to identify potential risks and to take action to remedy problems before they cause an accident or ill-health. In other words, they can generally make their businesses safer and healthier, and reap the benefits of improved productivity and quality.
What is a small and medium-sized enterprise?
The abbreviation SME occurs commonly for small and medium-sized enterprises in the European Union and in international organizations, such as the World Bank, the United Nations and the World Trade Organization. The term “small and medium businesses” or “SMBs” is predominantly used in the United States of America (USA).
There is no standard definition of what constitutes an SME or SMB, although the European Union has started to standardize the concept. Enterprises qualify as micro, small and mediumsized enterprises (SMEs) if they fulfil the criteria laid down in Recommendation 2003/361/EC. These are summarized in the table below. In addition to the staff headcount ceiling, an enterprise qualifies as an SME if it meets either the turnover ceiling or the balance sheet ceiling, but not necessarily both.
| Company category | Employees | Turnover | or | Balance sheet total |
|---|---|---|---|---|
| Medium-sized | < 250 | ≤ € 50 m | ≤ € 43 m | |
| Small | < 50 | ≤ € 10 m | ≤ € 10 m | |
| Micro | < 10 | ≤ € 2 m | ≤ € 2 m |
Source: European Commission Enterprise and Industry. SME Definition, accessed on: http://ec.europa.eu/growth/smes/business-friendly-environment/sme-definition/index_en.htm
In the USA, the definition of small business is set by a government department called the Small Business Administration (SBA) Size Standards Office. The USA, through the SBA, has chosen to set size standards for each individual North American Industry Classification System (NAICS) coded industry. This variation is intended to better reflect industry differences. The most common size standards for defining a “small business” are:
- 500 employees for most manufacturing and mining industries.
- 100 employees for wholesale trade industries.
- $7 million of annual receipts for most retail and service industries.
- $33.5 million of annual receipts for most general & heavy construction industries.
- $14 million of receipts for all special trade contractors.
- $0.75 million of receipts for most agricultural industries. 3
Why focus on risk assessment for small and medium-sized enterprises?
First of all, SMEs are characterized by higher rates of accidents and ill health – accidents are 20 per cent more frequent in small enterprises than in enterprises of more than 100 workers, and 40 per cent more frequent than in enterprises of more than 1,000 workers.
To understand how to address this problem, we have to establish why small enterprises are more vulnerable, and also why there is generally poorer safety and health management and a lack of application of OSH regulations in SMEs. This could be due to:
- A lack of in-house safety and health personnel.
- A lack of access to external OSH services.
- Limited experience of employers and workers in these SMEs, which are often precarious and tend to have a short life cycle as they start up and go out of business relatively quickly.
- Limited access to information and training opportunities.
- Limited knowledge of what constitutes “safe” equipment and machinery.
- Lower unionisation in SMEs (the presence of trade unions in a workplace has been linked with better OSH conditions).
- Perceived costs of improvements – employers in SMEs often fail to make the link between, on the one hand, accidents and ill health and their associated costs and, on the other hand, productivity and profitability.
Hence, there are many factors working to make SMEs more vulnerable – but when it comes to risk assessment, they also have to dance to the same regulatory tune. Risk assessment as a component of risk management has become a legal requirement in many countries. While employers are responsible for carrying out a risk assessment of their workplaces, larger companies will be able to call upon their own safety professionals to do this. However, it is likely that SMEs, and particularly small and micro-enterprises, will not have recourse to their own, in-house safety workers. It may well be that OSH services are available to carry out risk assessments for enterprises on a feefor- service basis. However, for small and micro-enterprises, controlling safety and health risks is not particularly difficult. With information and guidance to help build confidence, as well as the help of their workers, employers running SME can carry out risk assessments themselves. Armed with common sense, an in-house knowledge of the prevailing conditions in the enterprise and these guidelines, an employer can identify potential risks and implement measures to prevent and reduce accidents and ill-health at work.
This is the aim of this training package: to instil confidence, and empower owners and workers of SMEs to be able to carry out their own risk assessments for the benefit of workers and owners alike.
About the training package
There are no set ways of carrying out a risk assessment, and there is a wide variety of information and methodologies on the subject, which can sometimes be confusing. Based on, and respecting, this variety we have chosen in this training package what we believe to be a simple, straightforward and easy-to-use approach to safety and health risk assessment.
This training package contains easy-to-use material, with plenty of worked examples of risk assessment and a ready-to-use risk assessment form/template that can be used by SMEs the world over to improve their safety and health standards and business performance.
Target audiences
Whilst the primary target audiences are SME employers and workers, other types of organization can benefit from knowledge of, and training in, risk assessment, in order to help them integrate the topic into their work with SMEs or improve the services they provide to them. These may include:
- Employers’ organizations
- Trade unions
- Business development services
- Labour inspectorates
- Regulatory organizations, e.g. safety and health bodies
- Cooperative business organizations 4
- Women’s organizations
- Local government organizations
- Vocational training organizations
- Productivity institutes
- Microfinance institutions
- Social economy organizations. 5
Aims of the training package
This training package is designed to help those running and working in SMEs, as well as those who work with or provide services to SMEs, to improve OSH conditions in the workplace. It does this by:
- Demonstrating how risk assessment can help employers in SMEs, in cooperation with their workers, make their enterprises safer and healthier places to work, in a cost-effective manner.
- Demonstrating how risk assessment as part of enterprise risk management can be used to prevent and reduce injuries and ill health at work.
- Providing an overview of how to carry out a risk assessment in the workplace.
- Demonstrating how to decide on and implement safety and health improvements using the hierarchy of risk control measures.
- Showing how to find good practice to help decide on and implement the safety and health risk control measures determined in the risk assessment.
How to use this training package
Underlying assumptions
This training package is based on four main assumptions:
- If you run a small business or organization and you are confident that you understand what is involved, you can carry out the risk assessment yourself as part of your overall risk management strategy. You do not need to be a safety and health expert, although a degree of competency is required.
- To do the risk assessment satisfactorily, you and your representative(s) can be trained on the basic technique.
- Your workers can also receive basic training on risk assessment to enable them to: (i) input their experience and suggestions into the risk assessment, which is critical to good risk assessment; and (ii) help you implement and put into practice the risk control measures identified by your risk assessment, in order to protect workers’ safety and health before they are exposed to danger.
- Controlling safety and health risks is not especially difficult and can indeed result in important gains. It can be achieved with a little effort. It does not need to cost a lot and doing it properly can make good business sense. There can also be benefits from reduced claims for compensation and lower insurance premiums.
Structure and content
The main module in this training package covers:
- The five steps of workplace safety and health risk assessment, plus a training exercise for each of the steps.
- The hierarchy of risk control measures and the order in which they are to be decided on and implemented, in order to improve workplace safety and health conditions; it includes training exercises.
The training package also contains:
- A standard risk assessment form/template, which can be used by SMEs when carrying out their risk assessments.
- Worked examples for several occupational sectors where SMEs are prevalent.
PART I RISK ASSESSMENT METHODOLOGY
Basic concepts and terminology on risk assessment
The concept of a workplace risk assessment is that it is a continual, on-going process – like a film on a loop.
It is not a snapshot of a workplace – like a photograph, which can be likened to a workplace inspection.
While it may be beneficial to use information from workplace inspections when undertaking a risk assessment, we must be clear on the difference between inspections and risk assessments.
Before looking at how to carry out a risk assessment, and taking a detailed look at the five steps involved, it would be useful to clarify some basic concepts and terminology.
Hazard and risk
Hazard and risk are used interchangeably in everyday speech; consequently, to avoid confusion when carrying out a risk assessment, both terms need to be clearly defined and differentiated.
A hazard is anything that has the potential to cause harm, whether to the detriment of the health or safety of a person, or damage to property, equipment or the environment. The potential for harm is inherent in the substance or machine or poor work practice, etc.
A hazard can, therefore, be anything – work materials, equipment (e.g. machinery, tools, etc.), dangerous substances (dust, disease-causing micro-organisms, chemicals, pesticides, noise, etc.), transport, by-products, poor workplace layout, poor work organization, methods or practices, attitudes – that has the potential to cause harm, injure people and/or damage their health. There are an unlimited number of hazards that can be found in almost any workplace. (See activity 1 on identifying hazards in the workplace.)
Risk is the chance or probability that a hazard will actually result in injury or illness or damage to property, equipment or the environment, together with an indication of how serious the harm could be, including any long-term consequences.
Risk = severity of harm x probability of harm
It is a combination of the probability (likelihood) of an occurrence of a hazardous event and the severity of injury or damage caused by this event. 6
While hazards are intrinsic to a given substance or process, risks are not and so will vary depending on the levels of risk reduction measures applied. For example, pesticides are intrinsically toxic – they are hazardous – and spraying them may pose serious health risks to farmers or farmworkers. But where those hazards are properly controlled, the risks can be reduced to acceptable levels.
Similarly, 220 volt mains electricity is also intrinsically hazardous but using safety devices such as protective insulation sheathing, circuit breakers, fuses, residual current devices and voltage transformers can reduce the risks to acceptable levels. 7
When deciding on the acceptability of risk, it is important to take into account the gender, age and health of the workers for whom the assessment is being conducted and also to bear in mind their input.
The difference between safety and health
When carrying out a risk assessment, the different nature of safety hazards and risks and health hazards and risks has to be taken into account. This is especially the case when evaluating the long-term health consequences of exposure to workplace hazards and in the determination of appropriate risk controls.
Safety hazards and the resulting risks are generally more evident and, therefore, usually more straightforward for an employer to deal with. The high level of risk from an unguarded but dangerous machine, a cutting press, for example, is evident. The injury that can result is immediate and evident to all.
Health hazards and the resulting risks are often less evident and, therefore, less straightforward for an employer to deal with. Health problems caused by work can develop unnoticed and, in some cases, may not appear until much later in life. Early diagnosis and treatment may prevent a person’s condition from worsening and may even save a life. The effects of repeated, often low dose, exposure to a hazard – over weeks, months and years – also have to be taken into consideration. Examples include:
- Exposure to chemical pesticides (insecticides, fungicides, herbicides, etc.). In addition to poisoning (an immediate or “acute” health effect) some pesticides can result in cancers, which can take as many as 20 years or more to show up. Such effects are often associated with repeated, low-dose exposure.
- Exposure to organic crop or animal dust can result in asthma, which again may take years to develop. This too is often associated with repeated exposure and may result in recurring, long-term illness/asthma attacks.
- Carrying heavy and awkward loads over many years may result in permanent pain and physical disability or impairment in later life.
- Permanent disabilities or illnesses are referred to technically as “chronic” health problems, meaning that they cannot be fully cured or “reversed”.
Stress at work: the effects of stress are another area that may have to be considered in a risk assessment. Stress is often not easy to define, and again its effects on health may be long-term. Stress is part of what are often termed “psychosocial hazards.”
The scope of a risk assessment
Depending on the size and complexity of the business or enterprise, and the range of hazards (dangers) involved, the risk assessment can vary in scope. The risk assessment may be used to evaluate safety and health at the level of:
- The enterprise as a whole, covering all activities or processes and all the workers.
- A specific section of the workplace, e.g. a machine repair shop, covering a specific group or number of workers.
- A specific dangerous activity or process, e.g. problems with handling heavy loads, which may pose a danger to specific group, groups or numbers of workers.
The business in terms of occupational safety and health
Different terms are sometimes used to refer to a business or enterprise and its components. In safety and health terms, a “workplace” is considered as anything from an agricultural field, farmyard, construction site, small workshop, to a large machine shop in a factory or storage area in a warehouse. The term “undertaking” often refers to the larger unit, or to the whole “enterprise”. It may be necessary to decide at which level the risk assessment should be carried out; whether this is at the level of the undertaking, which may be made up of a series of workplaces, a farm with a series of fields or a factory with a series of different sections, for example, or at an individual workplace. If a business is small, there may only be one workplace and so the terms “workplace” and “undertaking” would, in this case, be identical.
What if the workplace is shared?
If you share a workplace with another employer, or a self-employed person, you will both need to:
- tell each other about the specific risks in your business that may affect the other employer; and
- cooperate and coordinate with each other to control the safety and health risks.
Telling the other employers and self-employed people present in any particular workplace about the risks to which your work could expose them, and what risk control measures you are taking, is essential. You must also think about the risks to your own workforce from those who share your workplace.
Where workers from different enterprises work in the same workplace, those assigned to carry out the risk assessments from each employer will need to share information about the risks and the measures needed to tackle these risks.
Carrying out the risk assessment
What is a risk assessment?
A workplace safety and health risk assessment is essentially a careful examination of what, in your work or business, could cause injury or ill health to people. It allows you to weigh up whether you have implemented enough risk control measures or should do more to prevent harm to those at risk, including workers and members of the public. The aim is to make sure that no one gets hurt or falls ill.
A risk assessment involves identifying the hazards present in a business (whether arising from work activities or from other factors, for example the layout of the premises) and then weighing up the extent of the risks involved, taking into account existing control measures already in place to reduce the risks and deciding if you have to do more to ensure that no one is harmed.
The results of a risk assessment should help employers choose which good practice measures, in the form of risk controls, are most appropriate. Workers and others have a right to be protected from harm caused by an employer’s failure to take reasonable risk control measures. The law does not expect you to eliminate risk but it does require you to protect people as far as you can. Doing the assessment and taking action is what matters. 8
A risk assessment involves dealing with the levels of risk in the actual conditions present at the time the risk assessment is carried out. It is important to identify who may be at risk and the safety and health consequences for EACH hazard separately as different risk control measures to prevent or reduce the probability (likelihood) and severity of harm will be required for each hazard.
The key to risk assessment is: do not overcomplicate the process. In carrying out a risk assessment it is important to focus, and decide, on the risk control measures that you need to put in place to make working conditions in your business safer and healthier. Avoid getting bogged down or lost in lengthy discussions on the degree of risk. Concentrate on deciding on the risk control measures and how to put them in place and make them operational. The risks in SMEs are especially familiar and the necessary risk control measures are also well known and easy to apply – you probably already know whether, for example, you have workers who move heavy loads and so could harm their backs, or where people are most likely to slip or trip. If so, check that you have reasonable risk control measures in place to avoid injury. You can try to do it yourself, while involving managers and workers. Involve as many workers as possible, in order to encourage them to share ownership of the finished assessments.
Risk assessment – a five-step process
The simplest and most straightforward way to carry out a risk assessment is for the employer – or designated representative(s) – with the active involvement of the entire workforce, to follow these five steps using the template provided below:
Step 1: Identify the hazards.
Step 2: Identify who might be harmed and how.
Step 3: Evaluate the risk – identify and decide on the safety and health risk control
measures, involving two sub-steps:
- Risk Control Measure 1: Elimination or substitution of hazards
- Risk Control Measure 2: Tools, equipment, technology and engineering
- Risk Control Measure 3: Safe work methods, practices, organization, information and training
- Risk Control Measure 4: Hygiene and welfare
- Risk Control Measure 5: Personal protective equipment
- Risk Control Measure 6: Health/medical surveillance
Step 3.A: Identify what you are already doing in terms of existing risk control measures
Step 3.B: Identify what further risk control measures are necessary
Step 4: Record who is responsible for implementing which control measures and the timeframe. Implement the safety and health risk control measures (deciding who is responsible for doing what, and by when).
Step 5: Monitor and review your risk assessment, and update when necessary.
Risk assessment template
A model risk assessment form is provided overleaf for you to copy or adapt and use, and is based on the above five steps. Examples of risk assessment for various occupational sectors (see Part III) use this template format. In the following pages we have used a simplified version to guide you through the steps of the risk assessment.
Download Risk assessment template (PDF)
Who carries out the risk assessment?
In many countries, the risk assessment is essentially the responsibility of the employer. The employer has a duty to:
- Ensure the safety and health of workers in every aspect related to work.
- Organise the risk assessment; select the person(s) to carry out the assessment and ensure that they are competent.
- Assess the risks and implement protective measures.
- Consult the workers or their representatives about the organization of the risk assessment, as well as the persons carrying out the assessment and implementing the preventive measures.
- Be in possession of an assessment of the risks.
- Draw up assessment records, having first consulted the workers and/or their representatives, or even having involved them in the work and making the records available to them.
- Ensure that everyone affected is informed about any hazard, any harm to which they may be at risk and all the protective measures taken to prevent such harm.
If you, as an employer, do not feel particularly confident in your ability to undertake a risk assessment, you can designate competent workers to carry out activities designed to prevent injuries and ill-health at work, or provide protection from risks of any type.
If you do designate a representative to carry out the risk assessment, the person or persons should be “competent” for the task – competent in the sense that they have a good knowledge of the workplace and work processes, know where to find and how to make use of good practice and have your authority behind them. A competent person is someone who has a thorough knowledge of the tasks involved and of the working environment, the ability to identify hazards and types and levels of risk, and an understanding of the necessary risk controls and how to put them into practice, as well as the authority to do so.
Where such in-house expertise is not available, you can employ the services of a competent external person to help. In such a case, you would need to check that they are familiar with specific work activities and have the ability to assess them.
For the purposes of SMEs, in most circumstances the persons carrying out the risk assessments do not need to be safety and health experts, but they can demonstrate their competence by showing they have:
- An understanding of the general approach to risk assessment.
- The capacity to apply this to the workplace and the task at hand. This may require:
- identifying safety and health problems;
- assessing and prioritizing the need for action;
- suggesting options available to eliminate or reduce risks and their relative merit;
- evaluating their effectiveness;
- promoting and communicating safety and health improvements and good practices.
- The ability to identify situations in which they would be unable to adequately assess the risk without help and the ability to advise on the need for further assistance.
The employer makes the final decision on who carries out the risk assessment. This can be:
- the employer;
- workers designated by the employer; or
- external assessors and services, if there is a lack of competent personnel in the workplace.
Whoever undertakes the risk assessment – even if it is an external service – it is the employer who is ultimately responsible for this assessment.
Active participation of the workforce
Remember that your risk assessment should always be carried out with the active involvement of the workers. The workers are often well aware of the hazards they face and tend to have ideas and suggestions on how best to control the risks arising from these hazards. They can help to come up with practical and cost-effective solutions to implement.
It is not the responsibility of the workers to carry out a risk assessment – this is the responsibility of the employer – but their active involvement will make for a better risk assessment and more accurate and cost-effective risk controls.
Risk assessments should not be carried out by the employer or the employer’s representative working in isolation. They should involve workers and/or the worker representatives. Workers should be consulted as part of the assessment process itself and given information on any conclusions reached, as well as on the risk control measures to be taken.
STEP 1: IDENTIFY THE HAZARDS
| Step 1 | Step 2 | Step 3 | Step 4 | |||
|---|---|---|---|---|---|---|
| What are the hazards? | Who might be harmed and how? | What are you already doing? | What further action is necessary? | Action by whom | Action by when | Done |
| Step 5: Record your findings, monitor and review, update as necessary | ||||||
The first step of a risk assessment is to survey all the areas of the workplace and identify any hazards – that is, those things that have the potential to cause harm. This is one of the most important steps in the risk assessment process. A hazard that is not identified cannot be managed. Consequently, it is crucial that this step is as comprehensive as possible.
When you work in a place every day, it is easy to overlook some hazards, so here are some tips to help you identify the ones that matter:
As an employer, or a designated worker or external service, you should:
- Walk around your workplace and look at what could reasonably be expected to cause harm.
- Identify which work activities and processes are the most dangerous/hazardous, and in which parts of the workplace (you may find it useful to use a checklist; in any case, it is important to take notes to enable an eventual written risk assessment to be drawn up).
- Ask your workers, or their representatives, what they think about the dangers of the jobs they carry out, and how workplace accidents and ill health can be prevented. They may have noticed things that are not immediately obvious to you or to an external service.
- Learn from experience of previous accidents and work-related ill health. These often help to identify the less obvious hazards.
- Remember to think about long-term hazards to health (e.g. high levels of noise or exposure to harmful substances), as well as safety hazards.
- If you are a member of a trade association, contact it. Many provide very helpful guidance.
- Check manufacturers’ instructions or data sheets for chemicals and equipment as they can be very helpful in signalling the hazards and putting them in their true perspective.
- Ask your workers if they can think of any hazard you have not identified or any worker at potential risk that you may have missed.
Tools for helping you to identify hazards:
- Previous workplace inspections or surveys
- Written or verbal hazard/accident reports
- Personal observations
- The safety and health committee, if one exists
- Warning labels or signs
- Manufacturers’ safety data sheets
- Manufacturers’ manuals or instructions
- Consultants’ reports
In the table below, the first column has been filled in with three examples of hazards commonly found in woodworking enterprises. These are examples; there are likely to be many more in your workplace and you should list them all.
| Step 1 | Step 2 | Step 3 | Step 4 | |||
|---|---|---|---|---|---|---|
| What are the hazards? | Who might be harmed and how? | What are you already doing? | What further action is necessary? | Action by whom | Action by when | Done |
| Exposure to wood dust | ||||||
| Machinery | ||||||
| Manual handling | ||||||
| Step 5: Record your findings, monitor and review, update as necessary | ||||||
STEP 2: IDENTIFY WHO MIGHT BE HARMED AND HOW
| Step 1 | Step 2 | Step 3 | Step 4 | |||
|---|---|---|---|---|---|---|
| What are the hazards? | Who might be harmed and how? | What are you already doing? | What further action is necessary? | Action by whom | Action by when | Done |
| Step 5: Record your findings, monitor and review, update as necessary | ||||||
For EACH hazard that you have identified – and there might be many – you need to be clear about who might be harmed and how. This means identifying groups of your workers, and others such as the public, who are at risk of exposure to the hazards, how they are at risk, and the potentially negative consequences for their safety and health.
Risk assessment does not mean listing everyone by name but rather identifying groups of people who are at risk of harm from a given hazard. For example, it is sufficient to say “staff working in the woodworking section” or “staff in the repair workshop” or “staff in the storeroom” or ”staff working in the agricultural field gang” or “young workers”. If known, it would also be useful to mention the numbers in each group.
You may also need to identify “others” who may be at risk of harm from the hazard you have identified. For example, people delivering supplies to your workplace or collecting finished products; cleaners or those carrying out maintenance or repair work in your enterprise; clients; and members of the public at risk from your work activities (e.g. passers-by on streets where buildings are being constructed or renovated). These should be considered as persons at risk, but attention should also be paid as to whether their presence may introduce new risks into the workplace.
You also need to be clear about how people might be harmed. What type of injury or ill health problems might result among the group of workers and/or others from the hazard you have identified. You need to assess their immediate safety and the possible consequences on their health, as well as longer-term consequences, namely health problems that may only appear or become damaging later in life (see Part I on “Basic concepts and terminology on risk assessment”).
It is also important that you think about groups of workers who may have particular safety and health vulnerabilities. New or young workers, new or expectant mothers, and people with disabilities may be at particular risk, for example.
As already mentioned, it is important to identify the safety and health consequences for EACH hazard and anyone who may be at risk and how – separately – as different risk control measures aimed at reducing the probability and severity of harm will be required for each hazard.
In the table below, we continue filling in the example of the woodworking workplace with the second step of the risk assessment. For each hazard identified, the corresponding group(s) of workers who may be exposed to the hazard need to be identified and recorded. Remember that this is a hypothetical situation, offered for example only.
| Step 1 | Step 2 | Step 3 | Step 4 | |||
|---|---|---|---|---|---|---|
| What are the hazards? | Who might be harmed and how? | What are you already doing? | What further action is necessary? | Action by whom | Action by when | Done |
| Exposure to wood dust | All workers (35) risk lung diseases, such as asthma, from inhaling wood dust. Machine operators (15) at higher risk of exposure. Hardwood dust can cause cancer, particularly of the nose. |
|||||
| Machinery, including circular saws, vertical spindle cutters and planers | Machine operators (15) and other workers, at risk of serious and possibly fatal injuries if in contact with moving parts of machinery, particularly saw blades. | |||||
| Manual handling | Workers may suffer musculoskeletal disorders, such as back pain, from handling heavy or bulky objects, e.g. timber boards and machinery parts. They also risk cuts when handling tooling, or splinters when handling pallets. | |||||
| Step 5: Record your findings, monitor and review, update as necessary | ||||||
STEP 3: EVALUATE THE RISK – IDENTIFY AND DECIDE ON THE SAFETY AND HEALTH RISK CONTROL MEASURES
| Step 1 | Step 2 | Step 3 | Step 4 | |||
|---|---|---|---|---|---|---|
| What are the hazards? | Who might be harmed and how? | What are you already doing? | What further action is necessary? | Action by whom | Action by when | Done |
| Step 5: Record your findings, monitor and review, update as necessary | ||||||
In Step 1, you identified the hazards and in Step 2 the different groups who might be harmed, as well as the numbers involved in each group, paying special attention to groups such as young workers, new or expectant mothers, and workers with disabilities.
For each hazard identified, the core activity in risk assessment is to identify, decide on, and implement the safety and health risk controls following the order in which they are listed in what is termed the “hierarchy of risk control measures”.
The hierarchy of risk control measures used in this training package has six levels: 9
- Risk Control Measure 1: Elimination or substitution of hazards
- Risk Control Measure 2: Tools, equipment, technology and engineering
- Risk Control Measure 3: Safe work methods, practices, organization, information and training
- Risk Control Measure 4: Hygiene and welfare
- Risk Control Measure 5: Personal protective equipment
- Risk Control Measure 6: Health/medical surveillance
The hierarchy of risk control measures has been developed by employers, workers, labour inspectors, safety and health practitioners, and others based on sound experience over many years. A worked example on pesticide spraying in a coffee plantation (see page 31) makes use of this hierarchy of risk control measures and is included to help make the process clearer.
The reason for deciding on and implementing the risk control measures in the order in which they are listed in the hierarchy is first to identify and decide on collective risk controls as they protect the work area and the people working in it – before moving on to consider individual risk controls, which simply protect an individual. For example, workers’ health will be better protected against exposure to harmful dust if your risk assessment first identifies dust extraction machinery as the main risk control. This gives collective protection to the work area and all persons in it rather than relying solely on dust masks for individual workers, which will generally not give anywhere near the same degree of lung protection, and, in addition, offers a limited degree of protection to the worker wearing it. Similarly, soundproofing a noisy machine controls noise more effectively than individual ear protection and avoids workers having to wear such protection for their whole work shift.
It must be pointed out that Risk Control Measure 6 on health/medical surveillance is not strictly a means of protection against exposure to hazards, but is more a monitoring tool to ensure the measures of protection are functioning adequately to prevent work-related illnesses. It can reduce the effects of risks if illnesses are diagnosed and action taken to reduce exposure before the illness develops further to a chronic or more serious level.
At this stage in the risk assessment, Step 3 consists of two parts, both of which use the hierarchy of risk control measures:
Step 3.A: What are you already doing in terms of existing risk control measures?
It is very likely that for some of the hazards identified you will already have certain safety and health risk control measures in place. In this case, for each hazard your risk assessment should identify and evaluate how effective these existing measures are in reducing safety and health risks to workers and other people. This means that you should evaluate and give your informed opinion (based, inter alia, on looking at good practice) on how effective you believe these existing risk control measures to be.
Identifying and evaluating the effectiveness of existing risk control measures will also help you determine, in a more efficient and cost-effective manner, which further risk control measures – if any – may be needed for a given hazard.
If you conclude in Step 3.A that your existing risk control measures for a given hazard provide adequate protection for workers, then no extra controls or expenditure are needed for this particular hazard. So for this hazard (and only for this hazard), you can mark “No further action at this stage” in Column 3.B.
If you decide that your existing risk control measures for a particular hazard are either absent or do not sufficiently reduce the risk of harm, you then proceed to Step 3.B and identify and decide “What further risk controls are needed?” and then implement them.
Step 3.B: What further risk control measures are needed?
| Step 1 | Step 2 | Step 3 | Step 4 | |||
|---|---|---|---|---|---|---|
| What are the hazards? | Who might be harmed and how? | What are you already doing? | What further action is necessary? | Action by whom | Action by when | Done |
| Exposure to wood dust | All workers (35) risk lung diseases, such as asthma, from inhaling wood dust. Machine operators (15) at higher risk of exposure. Hardwood dust can cause cancer, particularly of the nose. |
Risk Control Measure 1: Elimination or substitution of hazards. Risk Control Measure 2: Tools, equipment, technology and engineering. Risk Control Measure 3: Safe work methods, practices, organization, information and training. Risk Control Measure 4: Hygiene and welfare. Risk Control Measure 5: Personal protective equipment. Risk Control Measure 6: Health/medical surveillance. |
||||
| Machinery, including circular saws, vertical spindle cutters and planers | Machine operators (15) and other workers, at risk of serious and possibly fatal injuries if in contact with moving parts of machinery, particularly saw blades. | As above. | ||||
| Manual handling | Workers may suffer musculoskeletal disorders, such as back pain, from handling heavy or bulky objects, e.g. timber boards and machinery parts. They also risk cuts when handling tooling, or splinters when handling pallets. | As Above | ||||
| Step 5: Record your findings, monitor and review, update as necessary | ||||||
How to use the hierarchy of risk control measures
For each hazard identified, you should start Step 3 of the assessment with Risk Control Measure 1 and work your way through to Risk Control Measure 6.
Risk Control Measure 1: Elimination or substitution of hazards
Start by considering Risk Control Measure 1, which is the best means of protection because eliminating or substituting the hazard means you have effectively reduced the risk of exposure of anyone to the hazard, and thus of being seriously harmed, to zero or as near to zero as possible.
Examples of Risk Control Measure 1 include:
- Farming organically, in order to avoiding using a toxic pesticide.
- Switching to a less toxic pesticide, or substituting a liquid pesticide which is sprayed to one in granular form.
- Trying a less risky option using different substances or work processes. The process might be changed from one that uses a hazardous substance to one that does not, such as using a water-based paint instead of a solvent based paint.
- Some machine tools can be replaced with tools that are intrinsically safer, for example using a pneumatic tool instead of an electrical one.
- Asbestos can be effectively substituted by safer alternatives, of which there are many on the market.
- Replacing a noisy machine with a quieter one.
- On tall buildings, redesigning windows so that they can be cleaned from the inside rather than relying on potentially hazardous external access.
If you can successfully implement the measures identified in your Risk Control Measure 1, then your risk assessment for the particular hazard STOPS HERE as you have reduced the risk to zero, or as near as possible. Consequently, for this hazard only, you do not need to carry on identifying, deciding on and putting into place Risk Control Measures 2 to 6.
If, however, in your risk assessment you decide that elimination or substitution is not possible, you must then move on to considering the other risk control measures that you need to identify, decide upon and put in place, starting with Risk Control Measure 2 and working through to Risk Control Measure 6.
Risk Control Measure 2: Tools, equipment, technology and engineering
Where elimination or substitution is not possible, the next best solution is to consider which tools, equipment, technology and engineering measures can help reduce the risk from the hazard identified. Risk Control 2 measures are good because they provide collective protection of the work area rather than just protection for the individual.
Looking at good practice and seeking good advice can be very important in respect of Risk Control Measure 2. Examples of such initiatives, including some very simple and inexpensive measures, include:
- Guarding of machinery – if adequate protection is not provided by the manufacturer or if the machine is built to an old standard, improved guarding will be needed.
- Fitting noisy machines with a soundproofed enclosure, in order to reduce noise levels, even if some risks do remain.
- Completely isolating and/or enclosing some hazardous processes, for example X-ray equipment or the solvent gluing section in a workshop.
- Putting a handrail around a high work platform.
- Using something as simple as a wheelbarrow or hand cart to carry heavy loads.
- Having work surfaces or work benches at correct heights for the people working there, and providing suitable seating.
- Using tools that are the correct height for the person, e.g. spade, shovels, brushes, so that people do not have to bend unnecessarily.
- Using sealed mixing and filling systems for chemicals and pesticides.
- Using simple dust extracting equipment – local exhaust ventilation.
- Providing good lighting.
Often, simple, cost-effective equipment, tools, technology, or engineering will drastically reduce the risk of harm from a hazard for the group or groups of persons at risk, not simply for the individual.
Risk Control Measure 3: Safe work methods, practices, organization, information and training
Your risk assessment will also need to examine and consider safe work methods and practices, how the work can be organized, as well as training and information requirements. Once again, you need to identify what you are already doing and what extra control measures may need to be taken.
One of the simplest and most cost-effective ways of controlling risks at work is for businesses to develop and implement safe methods and practices of work, linked to information and training, sometimes referred to collectively as “safe systems of work”. Many work accidents, and much ill health, occur simply because the employer has not thought through and implemented safe work methods, practices and organization, and managers, supervisors and workers are not well informed about, or properly trained to implement, correct safety and health procedures.
Organizing the job safely is well within the competence of employers, their managers and supervisors, working together with the workforce. Risk control measures are often simple and easy to put into operation; moreover, improving safety and health and its organization is not costly and also promotes business efficiency.
Examples of measures that can be taken under Risk Control Measure 3 include:
- Ensuring clear procedures and instructions, written if necessary, on how to operate machinery or carry out other tasks safely – for your workers, supervisors and managers.
- Providing appropriate safety and health information – instruction manuals, clear labels on containers, warning signs, safety data sheets for chemicals, etc. (think about providing information in the appropriate local language).
- Planning or redesigning the layout of your workplace/enterprise – to avoid, for example, workers having to cross in front of forklift trucks or other moving vehicles, which will lessen the risk of being run into or run over.
- Better housekeeping – keeping your workplaces tidy, and passages clear of objects and clutter; wetting dust before sweeping it up.
- Ensuring that your supervisors or managers are adequately instructed and trained for the work they have to manage on your behalf, including training on, and input into, workplace risk assessments.
- Clear procedures and instructions for your supervisors and managers to follow.
- Ensuring your supervisors and managers have sufficient authority to keep safety and health standards up to scratch.
- Ensuring there are procedures in place, for example if you, the boss, are away from the workplace and the guard on a dangerous machine breaks.
- Ensuring your supervisors or managers have been instructed, and have the authority, to stop the work on that machine until the guard has been repaired or replaced.
- Ensuring that your supervisors and managers have the authority and means to order a new guard in your absence.
- Providing regular safety and health training for your workers, including training on risk assessment.
- Improving participation of and input from your workers in workplace risk assessments, including implementation of risk control measures identified in the risk assessment(s).
- Providing specialised training for high risk work activities.
Risk Control Measure 4: Hygiene and welfare
In your risk assessment you next have to evaluate and decide if your existing hygiene and welfare facilities are adequate to cope with the risks from the hazards you have identified or if you need to do more. Most of these measures are not strictly a means of protection against exposure to hazards, but they can reduce the effects of hazards and they can make work more pleasant. Improving hygiene and welfare can, for example, be done by:
- Providing basic washing and sanitary facilities at the workplace.
- Storing contaminated work clothing in a locker at work and not allowing workers to take such clothing to their homes.
- Providing simple first aid equipment and training certain workers to use it.
- Providing clean water and simple first aid for those of your workers working in an agricultural crop field or on a construction site.
Risk Control Measure 5: Personal protective equipment
You then move on to consider Risk Control Measure 5. Apart from standard items like boots and overalls, personal protective equipment (PPE) is one of the last safety and health risk control measure for you to consider and exists only to augment the other risk controls measures you have already put in place.
The idea is to keep the use of PPE to a minimum and not to use it as the main method of protecting safety and health or require workers to wear/use it for long periods. Your risk assessment should already have identified the combination of risk control measures 2 to 4, which should provide adequate protection for the groups of people who could be harmed. For example, if you have adequately controlled the noisy machinery to safe levels there is no need for you to provide ear plugs for your workers or for them to have to use them. Equally, if your dust extraction equipment (local exhaust ventilation) is effective, there is no need for workers to wear dust masks.
Unfortunately, PPE is often the first and only risk control measure considered and provided. Much of it does not provide adequate safety and health protection. It is uncomfortable to wear or use for long periods and often does not fit the user well. People are of different shapes, sizes and genders – one size does not fit all.
Personal protective equipment includes:
- Coveralls;
- Eye protection;
- Footwear;
- Gloves;
- Hearing protection;
- Dust or chemical respirators;
- Disposable dust masks;
- Safety helmets;
- Wet/cold-weather clothing.
If, in your risk assessment, you judge that PPE is needed, the assessment should include details of the types of PPE to be provided and the protection factor for each item provided, whether these are gloves, dust masks, chemical respirators or other equipment. You should also indicate in the assessment how the PPE will be cleaned and maintained, and how often it should be replaced. Remember that any PPE required should be provided at no cost to the worker.
Look at good practice and, if necessary, seek advice when selecting PPE.
When considering PPE, remember:
- You need to consider and introduce other means of risk control first. Provide PPE only as a last resort after putting into place the other risk control measures identified in your risk assessment. PPE should never be the first, or only, line of worker protection.
- Technical and engineering controls (Risk Control Measure 2) provide long-term collective solutions and are often cheaper than providing, replacing, maintaining and storing PPE for many individual workers.
- Collective protection measures protect all workers in the area, while PPE only protects the individual wearer.
- It is essential to involve your workers in the selection process as they often have detailed knowledge of the way things work, where things may be malfunctioning or the way tasks are carried out, all of which can help you.
Risk Control Measure 6: Health/medical surveillance
In your risk assessment, you may also need to consider if any health or medical surveillance measures provided by qualified medical personnel are needed for workers at high risk.
As already mentioned, health and medical surveillance is not strictly a means of protection against exposure to hazards, but is more a monitoring tool to ensure the measures of protection are functioning adequately to prevent work-related illnesses. However, it can help in mitigating the risk. Despite all your efforts to control exposure to hazardous substances (e.g. chemicals, dust, micro-organisms and noise), some workers may still experience symptoms of ill health, often later in life. You may need health/medical surveillance to monitor and detect early signs of ill health, especially if workers are exposed to (for example):
- Dusts that may cause asthma or other long-term lung disease.
- Substances such as solvents that may cause dermatitis.
- Pesticides that contain organophosphorus (OP) compounds, such as insecticides, sheep/animal dips, which can cause nerve poisoning.
- Machinery operating constantly at sound levels of 85 to 90 decibels (A weighted). Health/medical surveillance might include:
- Biological or biological effect monitoring, e.g. blood tests to detect certain hazardous chemicals.
- Regular checks by a responsible person, e.g. a trained supervisor could look at workers’ hands for signs of dermatitis.
- Auditory/hearing tests.
- Lung function tests if workers are exposed to high levels of hazardous dust.
- Monitoring the causes of sickness absence, for example if workers are absent from work due to illness, asking whether they or their doctor associate the illness with their work.
Identifying a specific medical/health surveillance measure for a particular hazard is not the same as having a general medical check-up. There is often confusion on this point. The health/medical surveillance risk control measure you use has to be specific to the hazard/problem you have identified.
In conclusion, where elimination or substitution is not possible the hierarchy of risk control measures gives priority to technical, equipment and engineering controls combined with safe work methods, practices, organization, information and training. The aim is to provide collective protection for workers, using PPE only to boost the other risk controls and avoid workers having to wear PPE for long periods (except for standard work items such as overalls and boots). It is also necessary to identify which hygiene and welfare measures are needed and, where appropriate, which health/medical surveillance measures would reduce the likelihood of especially long-term harm.
In the table below, we continue filling in the example of the woodworking workplace with the next steps (Steps 3.A and 3.B) in the risk assessment. For each hazard identified we give some examples of measures that may be used to reduce the risk, either indicating some measures that may already be used (Step 3.A) in our fictitious workplace or can be considered as a result of the risk assessment (Step 3.B). Remember that this is a hypothetical situation and cannot be taken as representative of the situation in any particular workplace.
| Step 1 | Step 2 | Step 3 | Step 4 | |||
|---|---|---|---|---|---|---|
| What are the hazards? | Who might be harmed and how? | What are you already doing? | What further action is necessary? | Action by whom | Action by when | Done |
| Exposure to wood dust | All workers (35) risk lung diseases, such as asthma, from inhaling wood dust. Machine operators (15) at higher risk of exposure. Hardwood dust can cause cancer, particularly of the nose. |
Dust is swept up regularly. Good washing facilities and shower already available. Disposable dust masks are provided and regularly replaced. |
Fit each dust-causing machine with dust extraction equipment (local exhaust ventilation) Remind staff never to sweep dry wood dust, to use vacuum cleaner or, if necessary, to wet dust before sweeping. Machine operators to be trained by a competent person in the use and basic maintenance of dust extraction equipment |
|||
| Machinery, including circular saws, vertical spindle cutters and planers | Machine operators (15) and other workers, at risk of serious and possibly fatal injuries if in contact with moving parts of machinery, particularly saw blades. | All machines guarded according to manufacturers’ instructions. Machine guards inspected regularly, maintained to ensure good condition. Workers have sufficient space at machines to work safely. All workers trained in safe use of machines by competent person. |
Fit braking devices to reduce the rundown time for cutting tools. Only machines fitted with brake controls will be purchased in future. Explore the possibilities for introducing chiplimited tooling. Re-check with the workforce that machine guards are inspected regularly and that defects are being promptly reported. Download information sheets on the safe use of machines used in the workshop. Pin them up in the workshop and rest-room. |
|||
| Manual handling | Workers may suffer musculoskeletal disorders, such as back pain, from handling heavy or bulky objects, e.g. timber boards and machinery parts. They also risk cuts when handling tooling, or splinters when handling pallets. | Workers trained in correct manual handling techniques. Workbenches and machine tables set at a comfortable height. Strong, thick gloves provided for handling tooling and pallets. |
Where possible, store tooling next to the machine to reduce carrying distance. Remind workers to ask for a new set of gloves when old ones show wear and tear, and not to lift objects that are too heavy. Introduce lifting and handling aids, such as panel handlers, to significantly reduce the risk of injury. |
|||
| Step 5: Record your findings, monitor and review, update as necessary | ||||||
Thinking through risk control measures – An example of pesticide spraying on a coffee plantation
The manager is carrying out a risk assessment to help find solutions to pesticide poisoning problems on the coffee plantation. Workers are exposed to pesticides from spray drift and failure to respect pesticide re-entry time intervals for sprayed areas.
There have been several recent incidents of relatively mild poisoning symptoms of field workers. These incidents have been reported to the government authorities, and the plantation manager and owner realise that safety and health practices need to be improved in this regard.
Step 1: Identifying the hazard
The hazard is identified as the spraying of toxic insecticides using motorised air blower equipment, which is currently resulting in spray drift.
A second hazard is non-respect of re-entry intervals (the time that must elapse before workers can re-enter a treated area).
Step 2: Who is at risk and how?
Twenty-eight field workers are at risk of exposure to the toxic insecticide during spraying (risk of breathing in the contaminated air) and when they re-enter the sprayed fields (risk of absorbing the pesticide through the skin). Ten of the field workers are adult women, eight are adult men, six are young female workers (under 18 years old), and four are young male workers (under 18 years old).
Step 3: Evaluating the risk – what action is necessary to reduce the risk
3.A: What is being done now?
The manager acknowledges that the spray team is applying the pesticide too close to where the field workers are working. This is due to poor work organisation and procedures on the plantation, including the lack of any form of warning before spraying activities.
He also acknowledges that re-entry intervals are not respected – he wrongly allows workers back into treated areas before it is safe to do so according to the instructions on the pesticide label.
3.B: What further action is necessary – Risk reduction measures
The manager now works systematically through the possible risk control measures. Where a particular risk control measure is not chosen or is not considered applicable for the particular problem, a short explanation is offered.
Risk Control Measure 1: Eliminating the hazard. This is always the best solution, but in this particular case the plantation owner does not use organic farming methods. The risk assessment concludes that total elimination of the insecticide is not an option, and other measures must be used.
Substitution is also not applicable in this case as the plantation owner decides that chemical insecticides must continue to be used for pest problems.
Risk Control Measure 2: Tools, equipment, technology and engineering. The motorised air blower pesticide sprayers are in good condition and are not the cause of the spray drift problem. Spray drift is a problem in windy conditions and spraying should take place as far as possible when there is no, or little, wind.
Risk Control Measure 3: Safe work methods, practices, organization, information and training. The manager, in consultation with the spray workers and field workers, determines that the key elements in preventing exposure to contamination from spray drift are work organization to ensure safer work practices, coupled with appropriate information and training. The following measures are identified for implementation:
- There will be no spraying in windy conditions (decision to be taken by the spray team supervisor).
- The spray team supervisor will regularly inform the field gang supervisor when and where spraying is due to take place. He will also submit written copies for the plantation owner and the manager. This will allow the field gang supervisor to ensure that her workers are well out of range of any danger of pesticide spray drift contamination.
- The spray team supervisor will inform his spray team members that if they see field workers nearby during spraying operations they are to stop spraying immediately and inform him of the situation. He will ensure that the field workers are removed to a safe distance. This safety element will be incorporated into the training programme of the spray team.
- The field workers will be informed that if they see the spray team working close by they are to immediately inform their own supervisor. They will then be removed to a safe distance from the spraying operations.
- Both the spray team and the field workers and their supervisors will receive extra training on the importance of respecting pesticide re-entry intervals based on information from pesticide manufacturers and suppliers. A written copy of the safe re-entry times for treated areas will be submitted to the plantation manager’s office. Simple warning signs, such as skull and crossbones, will be placed at appropriate distances around the treated area.
- Any possible work-related ill health will be noted in the plantation’s accident and disease recording book.
Risk Control Measure 4: Hygiene and welfare. Wash rooms and lockers to store workers’ personal belongings and food are provided near the main office, well away from the spraying areas. No further action is necessary in this respect.
Risk Control Measure 5: Personal protective equipment. The new working procedures should ensure that workers are not exposed to pesticide spray drift, and that they do not re-enter treated areas before it is authorised to do so as per manufacturers’ safety advice. Personal protective equipment and clothing should therefore not be necessary – at least against pesticide contamination.
Risk Control Measure 6: Health/medical surveillance. This is not strictly a risk control measure, but as pesticides are, by definition, toxic substances and there is always a residual risk of exposure, the younger workers (those presently under 18 years old) will be enrolled for blood testing under an international project recently established in the capital to monitor occupational exposures.
Conclusion
These simple improvements in procedure, communications, information and training mean that the plantation owner and her manager will now give clear instructions to supervisors and workers on how pesticide spraying will be carried out in a safer manner. This means that they will ensure the plantation will be well organised and run, and that supervisors and staff will be properly trained in safe work procedures. It also means that they will monitor the situation to ensure that the measures are maintained and adequate to prevent further injuries to health.
STEP 4: RECORD WHO IS RESPONSIBLE FOR IMPLEMENTING WHICH RISK CONTROL MEASURES, AND THE TIMEFRAME
| Step 1 | Step 2 | Step 3 | Step 4 | |||
|---|---|---|---|---|---|---|
| What are the hazards? | Who might be harmed and how? | What are you already doing? | What further action is necessary? | Action by whom | Action by when | Done |
| Step 5: Record your findings, monitor and review, update as necessary | ||||||
When risk control measures are decided on, as per Step 3.B, you need to take action to implement the measures. You also have to assign responsibility within the enterprise for their implementation within a reasonable timeframe and record the date they were acted upon and installed.
The risk assessment has three distinct responsibilities within Step 4:
- Action by whom in the enterprise?
- Action by when?
- On what date was the risk control measure installed or activated?
This means that for each control measure indicated in your risk assessment, you should specify the person(s) responsible for implementing the measure, along with a date for its completion. The risk assessment should also be marked up when the control measure has been successfully installed or activated.
When you evaluate risks it is common to find more problems than you can fix at once. This is why it is important to prioritize, and tackle the most serious risks first. This helps protect your workers, and makes for efficiency and cost effectiveness in your risk control measures.
In any risk assessment, the degree of risk and thus prioritization for action is, to a certain extent, based on personal judgement and opinion. However, you should show that you have based your priorities for action on sound reasons. At first, this may seem like a daunting task but remember the maxim, “keep it simple”, and seek advice and good practice as appropriate.
As mentioned earlier, risk is a function of the possible severity of injury or illness multiplied by the likelihood (or probability) of such harm occurring to workers. In this case, when you are evaluating the level of a risk you should pay attention to a number of things. For example:
- How likely is a situation that may cause an accident to occur? Remember that this is the situation at the time of the risk assessment, with the present methods of work and the present precautions already in place – or not, as the case may be. Is an event unlikely to occur, or even very likely to occur; is there something that could reasonably be expected to occur, or is even certain or imminent? What contributory factors could be involved – rushing a job, for example, or poor working conditions, or machinery that is difficult to use?
- What are the consequences of the accident likely to be? What could happen in the worst case scenario? If a worker slips or falls near a woodworking machine, for example, there could be several possible outcomes, ranging from negligible (no treatment needed) or minor injury (first aid treatment for a cut or bruise), right through to serious injury or death if the worker gets a limb caught up in the machine.
- What is the scale or degree of the risk? In other words, how far would the consequences of the accident reach – how many people, tasks, machines, customers or product batches would be affected?
The table below can give you some guidance on how to evaluate risk. You can also try using Activity 4 to help focus your reasoning for evaluating the degree of risk and prioritizing action to tackle the identified risks.
Using a risk matrix
Most small businesses will not need to use a risk matrix. However, such a tool can be used to help you work out the level of risk associated with a particular issue. A risk matrix does this by categorising the likelihood of harm and the potential severity of that harm. This is then plotted in a matrix (plural, matrices) as illustrated below. The risk level determines which risks should be tackled first, starting obviously with the highest risks.
Using a matrix can be helpful for prioritizing your actions to control a risk. It is suitable for many assessments and, in particular, for more complex situations. However, it does require expertise and experience to judge the likelihood of harm accurately. Getting this wrong could result in failing to take important risk reduction measures or applying unnecessary measures.
Just as there are no set methods of doing risk assessment, so you will find a wide variety of risk matrices, many of which are designed for use in larger enterprises. Therefore, given that this module is designed for SMEs, we have chosen, by way of example, a 3 by 3 risk matrix as we believe it is straightforward and easy to use to set priorities for action. It can also help to avoid getting bogged down or lost in lengthy discussions on the degree of risk, or prioritization.
Example of a risk matrix
This 3 by 3 risk matrix gives an indication, albeit subjective, of the different levels of risk as a basis for prioritizing which risk(s) to tackle first.
- Concerning the potential severity or consequences of an event, we have proposed three levels of harm:
- Slightly harmful: this may refer to injury or illness, which may need only minor first aid treatment, or there could be some short process interruption. It does not keep anyone off work for more than a couple of days, if at all.
- Moderately harmful: in this scenario there is the potential for more serious injuries or ill health that may cause temporary incapacity from which the person can recover – a broken arm or minor fracture, for example. The injury or illness keeps the victim off work and poorly for a substantial period of time. The employer can make a claim for lost time injury or illness, or process interruption may be for a couple of days.
- Very harmful: potentially serious injury or illness or death and possible long-term or permanent injury or illness, including death, amputations, and noise-induced hearing loss. “Life-changing injuries” is a common term in this context.
- Concerning the probability or likelihood of an event happening, we have proposed three levels:
- Low probability: where the risk of someone being harmed would be unlikely or infrequent; harm is not likely to occur in the present circumstances.
- Probable: where there is a strong possibility or likelihood of someone being injured or made ill when working in the present circumstances.
- Highly probable: work situations in which it is almost certain that someone will suffer either injury or illness in the present circumstances.
- Concerning the risk scale, we have proposed three levels of risk, which are arrived at by a combination of the level of harm and probability of the harm occurring:
- Low risk: there may be a slight risk of minor injury or ill health occurring. The probability of anything happening that may cause harm is low and the consequences of it happening could vary from slight to moderate.
- Medium risk: this can be assumed when the consequences or the severity of injury or ill health are serious, even if the likelihood of a causal event is low. It can also be assumed when the probability is raised, even when less serious harm can be expected to result, or where more people are likely to be harmed. In other words, the consequences could be slight, moderate or very harmful.
- High risk: this scenario is valid when it is probable or highly probable that there would be moderate or serious injury or illness or death.
Agreeing on the risk level of a situation in this way helps you define which risks to tackle first, starting, of course, with the high – unacceptable – risks that you have identified. Medium risks could also be considered unacceptable, especially when there is the potential, for example, of broken limbs from an accident or lost-time from damage to health. Measures to remedy the situation should be taken as soon as possible, with low cost measures, such as information and training, started immediately. Low risks may not be a priority but if there are measures that can be taken easily or at low cost, then they could also be considered for implementation as soon as possible, even at the same time as measures are being installed against other, higher-risk situations.
Some risk control measures may be easy to put in place. For example, changing working procedures, the way a job is done or improving housekeeping routines. Others may require a little more time and effort. Examples of this would be enclosing a noisy machine in a sound-proof box or installing local exhaust ventilation on machines to extract dust and fumes. The time frame should thus take account of how long it can reasonably be expected to take to complete a specific measure for improvement.
The workers should be informed of the changes to be undertaken and should also be involved in their design and implementation as appropriate. Additional training may be needed, especially if the risk control(s) involve changing working methods and practices.
In the table below, we continue filling in the example of the woodworking workplace with the fourth step in the risk assessment. In this example, we have merely proposed that the person responsible is “the manager” or “the supervisor”. In a real-life situation we would recommend that the person responsible is actually named in order to put a face with the tasks and responsibilities.
| Step 1 | Step 2 | Step 3 | Step 4 | |||
|---|---|---|---|---|---|---|
| What are the hazards? | Who might be harmed and how? | What are you already doing? | What further action is necessary? | Action by whom | Action by when | Done |
| Exposure to wood dust | All workers (35) risk lung diseases, such as asthma, from inhaling wood dust. Machine operators (15) at higher risk of exposure. Hardwood dust can cause cancer, particularly of the nose. |
Dust is swept up regularly. Good washing facilities and shower already available. Disposable dust masks are provided and regularly replaced. |
Fit each dust-causing machine with dust extraction equipment (local exhaust ventilation) -- Remind staff never to sweep dry wood dust, to use vacuum cleaner or, if necessary, to wet dust before sweeping. -- Machine operators to be trained by a competent person in the use and basic maintenance of dust extraction equipment |
Manager -- Supervisor -- Manager |
31/10/13 -- 15/05/13 (immediately) -- 05/11/13 |
4/10/13 -- 15/05/13 -- 15/10/13 |
| Machinery, including circular saws, vertical spindle cutters and planers | Machine operators (15) and other workers, at risk of serious and possibly fatal injuries if in contact with moving parts of machinery, particularly saw blades. | All machines guarded according to manufacturers’ instructions. Machine guards inspected regularly, maintained to ensure good condition. Workers have sufficient space at machines to work safely. All workers trained in safe use of machines by competent person. |
Fit braking devices to reduce the rundown time for cutting tools. -- Only machines fitted with brake controls will be purchased in future. -- Explore the possibilities for introducing chiplimited tooling. -- Re-check with the workforce that machine guards are inspected regularly and that defects are being promptly reported. -- Download information sheets on the safe use of machines used in the workshop. Pin them up in the workshop and rest-room. |
Manager -- Manger -- Manager -- Supervisor -- Manager |
01/07/13 -- As needed -- 20/05/13 -- 15/05/13 (immediately) -- 15/05/13 (immediately) |
30/06/13 -- - 24/05/13 -- 15/05/13 -- 15/05/13 |
| Manual handling | Workers may suffer musculoskeletal disorders, such as back pain, from handling heavy or bulky objects, e.g. timber boards and machinery parts. They also risk cuts when handling tooling, or splinters when handling pallets. | Workers trained in correct manual handling techniques. Workbenches and machine tables set at a comfortable height. Strong, thick gloves provided for handling tooling and pallets. |
Where possible, store tooling next to the machine to reduce carrying distance. -- Remind workers to ask for a new set of gloves when old ones show wear and tear, and not to lift objects that are too heavy. -- Introduce lifting and handling aids, such as panel handlers, to significantly reduce the risk of injury. |
Manager -- Supervisor -- Manager |
15/06/13 -- 15/05/13 (immediately) -- 01/06/13 |
14/06/13 -- 15/05/13 -- 25/05/13 |
| Step 5: Record your findings, monitor and review, update as necessary | ||||||
STEP 5: RECORD YOUR FINDINGS, MONITOR AND REVIEW YOUR RISK ASSESSMENT, AND UPDATE WHEN NECESSARY
| Step 1 | Step 2 | Step 3 | Step 4 | |||
|---|---|---|---|---|---|---|
| What are the hazards? | Who might be harmed and how? | What are you already doing? | What further action is necessary? | Action by whom | Action by when | Done |
| Step 5: Record your findings, monitor and review, update as necessary | ||||||
Taking action to implementing risk control measures is not the end of the risk assessment process.
Recording your findings: In Step 5, it is necessary to record and display your findings, writing down the significant hazards you have identified and the group(s) of workers and other people at risk. The risk control measures to be implemented and the responsible person(s) and other information noted in Step 4 must be recorded and readily available for workers, supervisors and OSH inspectors to see.
There is no set format for recording your findings. The table given as an example in this manual is designed to show the logical steps in a risk assessment and it is also convenient for recording your findings in a simple and readily accessible format. In reality, a risk assessment will be more extensive than the worked example we have used here. There will be more hazards identified for more processes. We have focused on only three hazards – wood dust, dangerous machines and manual handling – whereas woodworking enterprises often give rise to other risks such as chemical exposures, noise, slips, trips and falls, vehicles, electrical problems, and fire.
Risk assessments for SMEs do not have to be academic papers. They may sometimes be written by OSH professionals or experts but the intention is always for the employer of an enterprise to implement the recommendations. So the written risk assessment has to practical, as well as thorough. It should show that:
- A proper investigation has been undertaken.
- All the significant hazards have been identified and addressed, taking into account the number and vulnerabilities of people who could be involved.
- The precautions are reasonable and the residual risk is low.
This written record is a useful tool for employers, supervisors, workers and their representatives alike, and should be kept for future use. It can be used as a reference tool, to remind everyone to be aware of particular hazards and the measures needed to reduce the associated risks. The risk assessment will also be of interest to the labour or OSH inspectors as it allows them to see that the employer is complying with his or her duties to provide a safe and healthy working environment in accordance with the law.
Monitoring the effectiveness of the control measures: You will also need to monitor and check the effectiveness of risk control measures and ensure that they are maintained. Did the improvements identified in your risk assessment work? For each of the hazards you identified, were the risks reduced and the group or groups of persons better protected? Who will monitor and check that the improved safety and health risk control measures are still effective? Who will check that the new guarding procedures you identified for your dangerous woodworking machines are being followed? Who will check that the local exhaust installation you installed is still efficiently extracting the rubber dust and fumes?
Reviewing and updating your risk assessment: The risk assessment is not a one-time activity. It needs to be reviewed from time to time, at least annually if not more often. When you are running a business it is all too easy to forget about reviewing your risk assessment – until something has gone wrong and it is too late. Why not set a review date for this risk assessment now? Write it down and note it in your diary as an annual event.
Look at your risk assessment again. Have there been any changes? Are there any improvements you still need to make? Have your workers spotted a problem? Have you learned anything from accidents or near misses? Make sure your risk assessment stays up to date.
Few workplaces stay the same. Sooner or later, you will bring in new equipment, substances and/ or procedures that could lead to new hazards. It makes sense, therefore, to review what you are doing on an on-going basis. Every year or so, formally review where you are, in order to make sure that you are still improving or at least not sliding back.
During the year, if there is a significant change, do not wait. Check your risk assessment and, where necessary, amend it. If possible, it is best to think about the risk assessment when you are planning your change – this way you leave yourself more flexibility.
PART II TRAINER’S TOOLKIT
1. Planning, conducting and evaluating training activities: Checklists for trainers
In this training package we emphasise the importance of active learning methods. The ILO has produced a CD-ROM entitled “Your health and safety at work”. 10 This contains an instructor’s guide 11 which elaborates further. We have selected some of the most important elements and reproduced them in a series of checklists below. These should provide trainers with further information that will help in planning, conducting and evaluating training activities on risk assessment.
Key principles
First of all, there are some key principles upon which modern training methods are based and which lend themselves very well to risk assessment training. Risk assessment is not an academic exercise that can be learned through lectures. It is a very hands-on approach to safety and health improvements, carried out in the workplace, so what better way to introduce stakeholders to the method than by encouraging full participation in situations that are relevant and familiar? Some of the key principles are identified in the checklist below.
CHECKLIST: Key principles of training
- Learning by doing – participants learn far more by going through the motions of what is needed themselves.
- Collective work – educational activities work best by involving everyone and pooling knowledge, experience and skills. Work in small groups with regular reporting back encourages even the most reticent of people to contribute and broadens the pool of experience and ideas for improvements.
- Local workplace or community activities can help to ensure that the training course or session, the farmer field school or study circle is relevant and based upon the actual situations that the participants are facing.
- Activities are specific tasks that help course participants to focus, learn and be relevant to the situation they face. Some proposed activities to guide training in risk assessment are included below for you to use or adapt. You should translate the activities into the local language, if necessary.
- Handouts are useful for future reference for the participants. If you have the time, you could translate some of the key points from this guide to each activity (in the step-by-step guide below) and provide them as hand-outs to the participants after each activity has finished.
- Course reviews – throughout any training course, session or study circle there should be formal and informal ways of reviewing work done, to give trainers and participants the opportunity to adjust the course programme to meet identified priorities.
The trainer’s role
CHECKLIST: The trainer’s role Your role
Your role includes:
- Being aware of group dynamics and promoting equal participation, particularly in terms of gender, bringing out the shy participants and ensuring the dominant ones let the others contribute.
- Helping to organize the work by suggesting activities and ways of working.
- Helping participants to agree on the course guidelines.
- Ensuring that different opinions are respected.
- Organizing resources, including basic information, hand-outs, publications and copying facilities (where possible) to help the course work.
- Translating into local language(s) and adapting course materials to suit the needs of the participants.
- Giving advice and support.
- Facilitating discussions and feedback.
- Leading some discussions and summarizing key points.
- Arranging for external resource persons where this is felt necessary.
Small group activity
Encouraging participants to work in small groups is the main training method of choice, which lends itself well to training in risk assessment. There are several good reasons for using small group work in adult education:
CHECKLIST: Small group activity
- It is an active method.
- It encourages working co-operatively.
- It encourages less confident participants to become involved in discussions.
- It allows participants to work without feeling that they are always being watched by the trainer.
- It provides an effective way of structuring discussions.
- It will enable participants to investigate, discuss and respond to situations relating to their specific work situations.
Ideally, in small group work there should be three to four participants, in order to encourage maximum participation.
Active participation
Adults learn best when they are actively involved in the learning process and when they are encouraged to discuss their own experiences in the course. This type of learning is generally called “participatory” or “student-centred learning”. Advantages of this approach include:
- The learning process starts from, and builds on, the experience of course participants.
- Course participants learn through cooperative group activity and discussion.
- Course participants are given an opportunity to think out issues for themselves and develop a range of skills.
Participatory learning asks the participants to provide information, as well as receive it. In this way, participants are encouraged to learn from one another based on their own experiences. Using the experiences of participants helps them to learn and retain important information. Trainers may have to adapt their tutoring techniques, based on the following checklist principles of active participation:
Checklist: Active participation
- Give the participants regular opportunities to discuss their ideas for identifying hazards, evaluating risks and proposing measures of prevention and protection.
- Recognize the important contributions participants can make, based upon their personal experiences of work processes, and accept that they bring valuable information with them.
- Use a lecture format of teaching as little as possible. Divide the content of risk assessment training into logical steps, creating activities and stimulating discussions as a way for participants to learn.
- Be democratic in your tutoring practice and be willing to give up some control of a session, in order to allow participants to lead.
- Facilitate and guide participants through the learning process by providing direction and structure.
- Encourage the use of songs, dance and drama to get across key information and experience.
- Use practical but structured field visits to supplement classroom activity.
- Keep participants focused on the different tasks of the course.
- Help participants to learn from one another.
- Try to make sure that no one dominates the sessions.
- Encourage quiet participants to speak up and participate in all sessions.
Planning and preparation
It is important that trainers plan and prepare thoroughly. This is not to say that you cannot adapt your training to respond to the dynamics of the group and experiences of participants. But you should have a basic plan and be prepared with all the activities, hand-outs, materials such as markers and paper – and, of course, have a time frame for sessions.
Checklist: Planning and preparation
- Develop lesson plans (see example below) or a training outline prior to your course. Include in your lesson plan: introduction of objectives, core of the text, points to remember, summary and activities.
- You should translate any materials, especially the activities, into the local language(s).
- Remember items such as a flip chart, markers and paper, presentations, photos etc.
- For some activities, it is recommended that you make copies of materials ahead of time if you have access to copying facilities.
- Use different participatory methods and try to come up with your own participatory methods as well.
- Build upon the Training Package by developing new materials or new training methods.
You should develop lesson plans for each session. A sample planning sheet follows:
Training techniques
The checklist below provides brief explanations and guidelines for using a variety of training techniques:
Checklist: Training techniques
- Asking questions: questions can be used to stimulate discussion, but should not be used in a threatening way.
- Using a checklist: a checklist is a useful prompt for participants and you can provide checklists or help participants to develop their own, preferably in groups.
- Instant ideas or brainstorming: a technique used to encourage participants to generate a wide variety of ideas. Participants offer the first ideas that come into their head about the topic to be discussed.
- Action planning: Action plans can be developed individually or as a group activity. Participants will need to think about and develop a strategy for taking positive action to improve working conditions.
- Workplace or community activities: where there is an opportunity to engage in workplace or community activities such as identifying hazards in a workplace or looking at solutions found in other workplaces, they provide a link between the course, the participants and their workplaces or communities.
- Course meetings: these meetings are a democratic way of helping participants to influence the content and structure of the course.
- Small group activity: small group work is one of the main training methods used in courses on risk assessment.
- Group discussions: it is most important that trainers promote, stimulate and sustain group discussion as part of participatory learning.
- Using case-studies: case studies can be used effectively by trainers.
- Role-play: role-play is an active learning and participatory method that can generate considerable activity and interaction among course participants. Essentially, course participants are asked to act out a role in a given workplace situation. Types of role-play include interviewing, negotiating, taking part in a meeting or participating in a safety and health risk assessment.
Course evaluation
Just as the training course is based on group-working, active participation and involvement, evaluation should also be a collective process. Evaluation means that collectively and individually everyone reflects upon the course in which they have been involved. They consider questions about its relevance, what has been gained from it, its weaknesses and its successes. It should take place as an on-going feature of the course.
Checklist: Evaluation
- Before the start of the training, set your course aims.
- During the first or second course session, find out what the participants want from the course and together agree on revised aims.
- Use course meetings to assist the training process. A daily review should be built into the course meeting agenda.
- For each session/activity, check that the participants understand the aims and what they are expected to do.
- Review progress with the participants midway through the course.
- Carry out a final evaluation at the end of the course.
- Where possible, follow up a sample of participants a few weeks or months after the course has finished, in order to monitor the impact of the training upon their subsequent activities.
2. Activities on risk assessment
One of the main methods for getting participants to understand risk assessment and building their confidence that this is a “do-able” exercise is to work through the assessment step by step using a series of activities. Four activity sheets are proposed below to guide people through Steps 1 to 3 of the risk assessment process. They correspond to: identifying hazards (Step 1); who is at risk and how (Step 2); identifying and deciding on risk control measures (Steps 3.A. and 3.B.) and evaluating the degree of risk and prioritizing risks for action (part of Step 4). Activities are not proposed for the other part of Step 4 (defining who is responsible for implementing the measures) and Step 5 (monitoring and reviewing the risk assessment) because these are related to the “real world” and do not need to be discussed in depth.
The activities given here can be used in a course comprising participants from different work situations. This may be particularly interesting if the small groups base their work on a different work setting and the resulting risk assessments can be compared. The activities can also be used, perhaps more simply and relevantly, to identify the hazards, evaluate the risks and propose solutions for one particular workplace. This would be interesting, for example, if the course involved a visit to a workplace, and everyone could work on a risk assessment for that particular workplace. The activity sheets could also be used to focus the process of risk assessment in a workplace, without it being part of a specially-designed training course. Whatever the situation in which they may be used, the activity sheets can be adapted to meet it, and you are encouraged to do this.
List of activities:
Activity 1
STEP 1: Identifying hazards in the workplace
Activity 2
STEP 2: Who is at risk and how?
Activity 3
STEP 3.A and 3.B.: Identifying and deciding on risk control measures.
Activity 4
STEP 4: Evaluating the degree of risk and prioritizing risks for action.
Activity 1 STEP 1: IDENTIFYING HAZARDS IN THE WORKPLACE
- AIMS: To help you:
- Identify the range and nature of safety and health hazards in the workplace.
- Complete the first column of the risk assessment template/form – Step 1: What are the hazards?
- ORGANIZATION: Choose one person in the group to moderate the discussion and write the results on the flip chart and on cards. Choose another to present the cards to the whole workshop.
- TASK: This is a “brainstorming” session. You will be divided into groups. In your small group, discuss which hazards workers face in the workplace (or occupational sector) under consideration. You can think of the hazards from your own workplace or workplace visits you have made and/or refer to the worked examples, in the upcoming sections.
List the hazards on the flip chart. Try to use the categories suggested overleaf – with some examples to guide you – so that you systematically consider the full range of hazards for your risk assessment. The proposed categories are safety hazards, usually more obvious to identify; health hazards, or “hidden” hazards, often more difficult to identify; and organizational hazards. If you are unable to decide where a hazard “fits”, do not worry, just write it down and move on.
Write down everyone’s proposals – each person’s ideas are as valid as those of the next person. There does not need to be a consensus.
When the group has compiled a list of hazards, you should choose what you believe to be the four most important issues and write them on the cards that have been given to your group. For this, you will also be given stickers with which to attach the cards to the wall.
The spokesperson will present the group’s cards to the plenary session.
The cards will be attached to the wall as the first column of the risk assessment template.
To help you identify hazards in this exercise:
Look at Part I on Hazard and Risk, to make sure you are clear about the difference between the two terms. Remember: a “hazard” can be anything – e.g. work materials, dangerous substances, byproducts, equipment, poor work methods, practices, attitudes – that has the potential to cause harm.
You can use the categories below to make sure you consider the full range of hazards you may need to identify in your risk assessment:
Safety, or “obvious”, hazards. For example:
- Unguarded moving parts of machinery
- Cutting tools
- Heavy loads, manual lifting and handling of loads
- Electricity: from fixed installations, extension leads and portable equipment
- Unguarded walkways, ladders etc.
- Falling objects - crates, boxes, bales, heavy bundles of fruit from trees
- Poor lighting
- Obstructions – untidy, blocked passageways in workshops
- Flammable liquids
- Snakes and wild animals
Health or “hidden” hazards. For example:
- Repetitive work
- Noise
- Pesticides and other hazardous/toxic chemicals
- Dusts
- Disease-causing micro-organisms
- Vibration
- Lack of seating, leading to standing for long periods
- Chairs and computer screens
- Extreme temperatures
Organizational hazards. There are some important issues to be considered that may not have previously been linked to safety and health conditions. For example:
- The way work is organized – are there clear working procedures and practices, and adequate information and training to do the particular task in a safe and health manner?
- Poor housekeeping
- Monotonous or poorly designed work
- Long working hours, lack of rest periods, consecutive working, shift work
- Harassment, on whatever grounds, for example, sexual and racial bullying
- Violence and aggression
- Staffing levels
- Working alone
These are a few examples; there are many more hazards that can be present in any workplace.
Activity 2 STEP 2: WHO IS AT RISK, AND HOW?
- AIMS: To help you:
- Identify who is exposed to, and at risk from, the various hazards you have identified.
- Consider “hidden” or “forgotten” workers who may be at risk such as contractors, maintenance or delivery workers, cleaners, the public or groups with special requirements.
- Think about how they could be harmed by the hazards you have identified.
- Complete the second column of the risk assessment template/form to define who is at risk, and how?
- ORGANIZATION: Choose one person in the group to moderate the discussion and write the results on the flip chart and on cards. Choose another to present the cards to the whole workshop.
- TASK: In your small groups, reproduce the table below on your flip chart.
In the first column, write each of the four hazards identified in the previous exercise and recorded on the risk assessment chart.For each hazard, think about who is most at risk and record this in the second column.
The third column is to record who you think could also be at risk. Think about other workers or groups of people such as family members, the public, or anyone else who may be exposed to the hazard.
In the fourth column, think about people who may be particularly vulnerable (such as children and pregnant women). Why should they be more vulnerable?
In the fifth column, record what you think may be the consequences of exposure to the hazard.
Write down everyone’s proposals – each person’s ideas are as valid as those of the next person. There does not need to be a consensus.
Each group should now summarize its conclusions on cards to be attached to the wall to form the “who is at risk and how” part of the risk assessment.
The spokesperson will present the group’s cards to the plenary.
For this exercise you need to think about:
Workers in the enterprise at risk: are all workers at risk from a particular hazard or is it only a smaller group of workers? For example, workers directly operating woodworking or metalworking cutting machinery? What are the safety and/or health consequences of this group (these groups) of workers being exposed to a particular hazard?
Workers from outside: maintenance and repair workers, delivery/transport workers, etc. For example, delivery workers may be at risk of being knocked down by a forklift truck in the (unfamiliar) enterprise to which they are delivering. What are the safety and/or health consequences of this group (these groups) of workers being exposed to a particular hazard?
Vulnerable workers: there may be groups of workers in the enterprise that are especially vulnerable – young workers, workers with disabilities, pregnant workers, etc. What extra safety and/or health risks may they face from a particular hazard(s)? What are the safety and/or health consequences of this group (these groups) of workers being exposed to a particular hazard?
Others: who else do you think could be at risk? For example, members of the public passing by a construction site or using a temporary walkway under scaffolding? What are the safety and/or health consequences of the public being exposed to a particular hazard?
Activity 3 STEP 3.A and B: IDENTIFYING AND DECIDING ON RISK CONTROL MEASURES
- AIMS: To help you:
- Decide if present measures of protection are adequate.
- Think of the stages in taking up priority safety and health problems.
- Work out the most effective means of action.
- Complete the third and fourth columns of the risk assessment template/form – Steps 3.A and 3.B concerning measures of risk reduction.
- Decide if present measures of protection are adequate.
- ORGANIZATION: Choose one person in the group to moderate the discussion and write the results on the flipchart. Choose another to present your findings to the whole workshop.
- TASK: In your small groups, create a blank chart on a large sheet of paper, with six columns labelled according to the following model:
Look at the hazards identified in the risk assessment so far and use these as the basis for this exercise – fill in the first column.
Then fill in the next four columns. For each hazard your group is considering, think about:
- If you would apply the first measures in the list or not; that is, can you eliminate the hazard or substitute with a less dangerous substance or machine, for example?
- If you answered “yes” to the first measure, in the next column explain how you would go about eliminating or substituting the hazard.
- If you answered “no”, explain in the next column why this particular measure (elimination or substitution) is not an option.
- Then go on to the next stage (collective means of protection) and repeat the exercise.
- Do this for each step and for each hazard identified.
You may think of more than one solution – all should be listed.
When the group has listed its decisions and reasoning on the flip chart, it should transfer the results – the measures it thinks should be implemented – onto the cards provided. The cards should then be attached to the wall to form the next stage of the risk assessment.
Choose a spokesperson to present your findings to the workshop.
Activity 4 STEP 4: EVALUATING THE DEGREE OF RISK, AND PRIORITIZING RISKS FOR ACTION
- AIMS: To help you:
- Understand risk assessment and the interaction between the probability (likelihood) of the risk of harm happening and the severity of possible injury or ill health.
- Think about which hazards pose the greatest risk of harm and which should, therefore, be the priorities for action to implement risk control measures.
- ORGANIZATION: Choose one person in the group to moderate the discussion and write the results on the flip chart and on cards. Choose another to present the cards to the whole workshop.
- TASK: In your small groups, reproduce the risk matrix below on your flip chart.
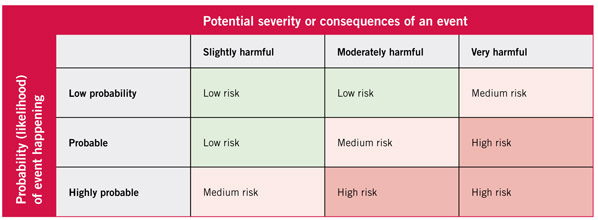
Please study each of the hazards identified at the beginning of the risk assessment exercise.
For each hazard, decide what harm could result from exposure to it. Write this on the small sticky labels provided.
For each identified potential effect (cancer, lung disease, amputation of arm, absenteeism due to stress, damage to machinery, etc.) consider the degree of harm. Would the effect be slightly harmful, moderately harmful or very harmful?
You should also consider the probability of something happening to cause harm – is this not very likely to occur (low probability), probable or highly probable in the present circumstances?
Once you have made your choices concerning the consequences and the probability, you can stick your small labels on the appropriate places on the risk matrix.
This defines the risk – high, medium or low – for each potential outcome according to its place on the matrix. It will allow you to define priorities for action to identify, decide on and implement risk control measures
Next, transfer the information from the risk matrix to the cards, which can be fixed to the next stage (Step 4) of the risk assessment we are building up on the wall.
The spokesperson will present the group’s cards to the plenary session.
PART III EXAMPLES OF RISK ASSESSMENTS
EXAMPLES OF RISK ASSESSMENTS FOR SELECTED WORKPLACES
The example risk assessments on the following pages show the kind of approach an SME can take and can be used as a guide to promote thought about some of the hazards that may be found. The assessments do not identify all of the hazards that could be found in the enterprises or indeed all the control measures that can be used to control the risk.
Remember every enterprise is different and each will need to think through the hazards and associated control measures required in their respective workplaces. Even when the hazards are the same, enterprises may have to adopt different control measures.
How were the risk assessments done?
- 1. The workplace manager:
- Used, where possible, the internet to locate advice (much of which is free) to learn about the hazards that occur and the control measures (best practice) used in their type of enterprise.
- Walked about the workplace, inside and outside, noting the hazards seen.
- Talked to workers to learn from their knowledge about the systems of work adopted on the premises, and to ask their opinion about safety and health issues.
- Checked the manufacturers’ instructions for tools and machinery.
- Obtained information about chemicals (from safety data sheets) and other products used (from product suppliers) for potential hazards.
- Looked at the accident records to identify causes of accidents.
- Looked at workplace inspection records.
- The manager then wrote down who could be harmed by the hazards and how.
- For each hazard the manager wrote down what control measures, if any, were in place to reduce the risk. The control measures were compared to best practice and guidance material previously located. If there were no existing control measures in place or where the existing measures were not considered sufficient the manager identified what else needed to be done to reduce the risk.
- Putting the risk assessment into practice, the manager decided and recorded who was responsible for implementing the further actions needed. He also prioritized what should be done first according to the degree of risk identified, and recorded the date by which the different action should be completed. The manager discussed the findings of the risk assessment with the staff and the assessment was displayed for the staff see.
- A decision was made to review and update the assessment every year and as conditions warranted, for example if they changed with the introduction of new machinery, new location or systems of work.
The examples in this annex 12 relate to following industries:
1. Brick layers (Construction) (PDF)
2. Call centres (PDF)
3. Hairdressing (PDF)
4. Motor vehicle repair (PDF)
5. Office cleaning (PDF)
Annex: Further information
There are many risk assessment tools and methodologies available to help enterprises and organizations assess their risks. The choice of method will depend on workplace conditions, including, for example, the number of workers, the type of work activities and equipment, the particular features of the workplace and any specific risks.
The most common risk assessment tools are checklists, which are a useful means to help identify hazards. Other kinds of risk assessment tools include guides, guidance documents, handbooks, brochures, questionnaires and “interactive tools” (free interactive software, including downloadable applications, which are usually sector-specific). These tools can be either generic or branch or risk-specific.
Some of the sources where you can access such information and tools are listed in the section on good practice and information below.
Where to find good practice and information
International and regional organizations
- International Labour Organization (ILO)
- Guidelines on occupational safety and health management systems: Geneva, ILO Safework, 2001. http://www.ilo.org/wcmsp5/groups/public/@dgreports/@dcomm/@publ/documents/publication/wcms_publ_9221116344_en.pdf
- Work improvement in small enterprises (WISE). Geneva, ILO Conditions of Work and Employment Programme (TRAVAIL). http://www.ilo.org/wcmsp5/groups/public/---ed_protect/---protrav/---travail/documents/instructionalmaterial/wcms_152469.pdf
- The WISE Package for Trainers. Geneva, ILO Conditions of Work and Employment Programme (TRAVAIL). http://www.ilo.org/wcmsp5/groups/public/---ed_protect/---protrav/---safework/documents/instructionalmaterial/wcms_110322.pdf
- European Union Agency for Safety and Health at Work (EU OSHA)
- The key role played by risk assessment is set out in the EU Framework Directive on safety and health: Council Directive 89/391/EEC of 12 June 1989 on the introduction of measures to encourage improvements in the safety and health of workers at work. http://eur-lex.europa.eu/LexUriServ/LexUriServ.do?uri=CONSLEG:1989L0391:20081211:EN:PDF
- EU OSHA has developed a risk assessment tools database with tools from all over Europe. These tools are free and available online. The database is updated regularly with new tools. http://osha.europa.eu/en/practical-solutions/risk-assessment-tools
- Guidance on risk assessment at work: Health and safety. European Commission, Directorate General V (Public health and safety at work directorate), 1996, ISBN 92-827- 4278-4. http://osha.europa.eu/en/topics/riskassessment/guidance.pdf
- Risk assessment essentials. This is a basic guide to risk assessment, including checklists for different hazards and sectors or work and examples of preventive measures, which can be used to reduce risk. http://osha.europa.eu/en/campaigns/hwi/about/material/rat2007
National organizations
Many organizations dealing with safety and health at work have produced publications that can be consulted for further information when carrying out risk assessments. The materials vary from brochures and information sheets through to practical manuals. Some are aimed at specific sectors or address specific hazards. Many are free of charge and have the advantage of being in the local language.
Some interesting information sources include organizations in the following countries:
- Canada: The Canadian Centre for Occupational Health and Safety (CCOHS). http://www.ccohs.ca/ccohs.html
- Finland: The Finnish Institute of Occupational Health. http://www.ttl.fi/en/safety/risk_assessment/pages/default.aspx
- France: Evaluation des risques professionnels, Institut national de recherche et de sécurité pour la prévention d’accidents du travail et des maladies professionnels (INRS), 2009. http://www.inrs.fr/accueil/demarche/evaluation-risques.html
- Ireland: Guidelines on risk assessment and safety statements, Irish Health and Safety Authority, 2006. http://www.safetyireland.com/pdf/hsa_safety_statements.pdf Guidelines_on_Risk_Assessments_and_Safety_Statements.pdf
- Norway: The Norwegian Labour Inspection Authority. http://www.arbeidstilsynet.no/artikkel.html?tid=79289
- Spain: The National Occupational Safety and Health Institute (INSHT) has published a series of seventeen Technical Guides on Risk Assessment. http://www.insht.es/portal/site/Insht/menuitem.1f1a3bc79ab34c578c2e8884060961ca/?vgnextoid=d8388dd6caa62110VgnVCM100000dc0ca8c0RCRD&vgnextchannel=75164a7f8a651110VgnVCM100000dc0ca8c0RCRD
- Sweden: Investigation and risk assessment in systematic work environment management – a guide, The Swedish Work Environment Authority (Arbetsmiljöverket) 2003. Second ed., 2004, ISBN 91-7464-449-1. http://www.av.se/dokument/inenglish/books/h375eng.pdf
- UK: The Health and Safety Executive’s website on risk assessment includes many worked examples for different sectors and health and safety topics. http://www.hse.gov.uk/risk/
1. Work improvement in small enterprises (WISE). Geneva, ILO Conditions of Work and Employment Programme (TRAVAIL), 2007, accessed on: http://www.ilo.org/travail/whatwedo/instructionmaterials/WCMS_152469/lang--en/index.htm
2. Guidelines on occupational safety and health management systems: Geneva ILO Safework, 2001, accessed on: http://www.ilo.org/wcmsp5/groups/public/@dgreports/@dcomm/@publ/documents/publication/wcms_publ_9221116344_en.pdf
3. US Small Business Administration, USA, accessed on: http://www.sba.gov/content/summary-size-standards-industry
4. The term "cooperative" means an autonomous association of persons united voluntarily to meet their common economic, social and cultural needs and aspirations through a jointly owned and democratically controlled enterprise. ILO Recommendation No. 193, Promotion of Cooperatives, 2002.
5. A significant proportion of economies are organised to make profits not only for investors. The so-called social economy, including cooperatives, mutual societies, non-profit associations, foundations and social enterprises, provides a wide range of products and services and generates millions of jobs. When policy-makers work to improve the business environment, they need to ensure that their efforts take account of the specific characteristics of enterprises, particularly SMEs, in the social economy. Source: European Commission Enterprise and Industry. Small and medium-sized enterprises. Social economy – reference documents, accessed on: http://ec.europa.eu/growth/smes/
6. Guidelines on occupational safety and health management systems: Geneva ILO Safework, 2001, Glossary, pp. 19-20.
7. Occupational safety and health. ITC-ILO Curriculum on Building modern and effective labour inspection systems, ILO Geneva, 2009, Module 8, Section 3.1, p. 27.
8. Health and Safety Executive, UK, accessed on: http://www.hse.gov.uk/pubns/indg163.pdf
9. Other risk control hierarchies may have different headings but the essential point about any hierarchy is to identify, decide on and put in place collective risk-control measures first of all. In other words, whatever the hierarchy you do not start with personal protective equipment, which, at best, only helps protect the individual. Starting with elimination, tools and equipment, technology and engineering measures will improve safety and health conditions for all staff in a particular workplace/work area.
10. Accessed on: http://www.ilo.org/safework/info/instr/WCMS_113080/lang--en/index.htm
11. Accessed on: http://www.actrav.itcilo.org/actrav-english/telearn/osh/guide/gumain.htm
12. The ILO would like to acknowledge that the annex contains public sector information published by the Health and Safety Executive, United Kingdom and licensed under the United Kingdom Open Government Licence v1.0.